Building the Bottlehead Crack Headphone Amplifier (Review & Impressions)

This thing is like a nice glass of Bourbon for my ears, and I wanted the pictures to reflect that vibe.
Bottom line: The perfect pairing for my Sennheiser 650s. No other amp that I’ve tried for them in 14 years has made them sound as good.
I bought the kit about two years before I started building it. I had a few other projects to work on before this one, so in preparation for it I spent weeks online reading through many of the help posts on the Bottlehead forums, looking for the most common issues people have while building these and I also researched upgrades and other modifications for it.
This isn’t my first DIY audio project, but so far this one has been the most rewarding in terms of sound quality. Bottlehead says it’s a good first project for those looking to dip their feet into the world of DIY audio, but I have to disagree. A good first project would be one that deals with low voltages, like a simple pocket amplifier that can run on batteries and not one that has the potential to seriously injure or kill you. At around 60 bucks shy of $500 for the cost of the kit plus the Speedball uprade, I would advise a cheaper kit just to get your feet wet. I also feel good soldering skills are a requirement for this build; the large transformer can easily be damaged (it can also kill you where you stand if you’re not careful when testing its voltage) and is
one of the most expensive components in the kit. It’s strongly advised to follow the instructions and testing procedures to the letter.
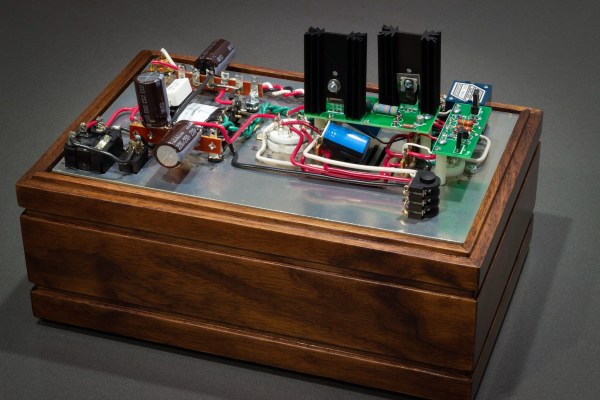
 I bought some of the tubes even before it was finished and in the process, I also improved my woodworking skills. The painting of the metal parts and finishing of the wood base alone took months (painting/finishing of the chassis and end bell has to be done before assembling the kit). The wood base has 8 coats of danish oil (wet sanding the application of all but the first coat), with drying and sanding in between each coat.
The only modifications to the amp so far are an Alps blue velvet potentiometer and input and output tube upgrades. The Alps pot has lug type connectors, which make it very easy to solder but this has raised concerns as to the authenticity of these since the official Alps RK27 series datasheet only shows them with soldering pins (because they’re meant to be soldered onto a PCB), so there’s a pretty good chance this one is counterfeit. I bought it from an eBay seller in Hong Kong, who guaranteed it’s quality and said I could return it if I didn’t like it. I measured resistance for both channels and it measured really well, with very minor variations between the left and right channels even at the lowest (highest resistance) settings. It wouldn’t be a huge deal to replace it with another Alps pot (with pins and not lugs) from a reputable seller like Mouser but soldering the wires to lugs rather than pins is much easier. There are also aftermarket PCBs you can solder the pot into, which also provide holes to solder the wires into, which is the route I would have taken if I decided to use an Alps pot with pins, but I decided to give the “fake” Alps pot a shot. If this one’s a fake, it’s a really good one. The pot is smooth and has a nice feel to it when turning, it doesn’t feel flimsy or too light. There is zero noise when turning it and at the lowest audible levels, both channels track evenly.

From the four 12au7 tubes I have, a Mullard input tube has made the most difference in sound. It’s an NOS made in GB and it has a slightly warmer low end and what I perceive as a non-fatiguing, wide stereo image with more instrument separation than the stock no-brand Made in China 12AU7 tube that came with the kit – although this one sounds better to my ears than the other two tubes I bought for it (a NOS Silvertone and a NOS Tung-Sol, both labeled “Made in Great Britain”). After being quite impressed by the Chinese tube, I went online and found some that look identical to it on AliExpress (cost ~$15).
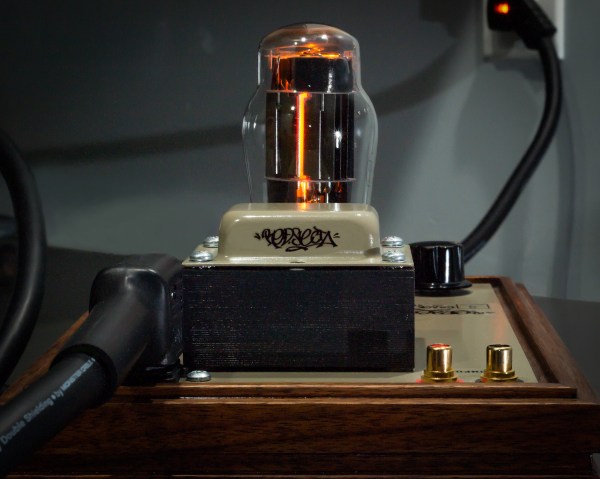
I replaced the stock 6080 output tube (the bigger one on the amp) for an RCA 6AS7G just because it looks cooler to me than the included 6080. I can’t hear a sonic difference between the two the way I hear a difference when “rolling” the smaller (input) tube.
The kit comes with solid core wire and after building it, I was left with about 8” of each wire. Bottlehead makes sure you get enough wire with your kit in case you make a mistake. They don’t include solder with the kit, but they recommend using lead-based solder as it’s easier to use than lead-free solder (melts easier). I use Cardas quad eutectic solder on everything I build and already had plenty of it on hand.
 Confident that I had built it exactly as shown on the manual, I expected the amp would work perfectly as soon as I powered it on, but it didn’t. One of the tiny LEDs that goes under the input tube was cold, and audio was only passing to the right channel. I reported this on the Crack forums and got a reply the next day from one of Bottlehead’s engineers. They asked me to check voltages at different points of the input tube’s socket and determined that it was just a bad LED. They then provided instructions on how to bypass it, but instead I decided to order some LEDs online (Bottlehead didn’t offer to send me a free replacement). They said I probably applied too much heat when soldering it on, but I believe it was a defective LED from the start. I’ve learned over the years that you can fry components if you’re not careful and apply heat for too long with the iron, so I’m always super careful to not do so (another reason I don’t think this is a good first kit for a beginner). After replacing the LED, the amp was in business. The Speedball circuit I built later uses 8 of the same LEDs and all of those were fine.
I ran the amp stock for more than a month before building and installing the Speedball upgrade for it. The biggest difference I heard with the upgrade was a cleaner output. Before, with the volume up about ½ way with no audio playing, there seemed to be a tiny bit of background noise that I could hear between tracks. With the Speedball, it is completely silent at that position. I can still hear a tiny amount of background noise, but only when I turn up the volume to 90-100%. Some say the Speedball also affects the low end and soundstage, but I can’t say that I heard a difference. I’m not sure if I hear a little bit more separation, so frankly I’m hesitant to say there is more soundstage (depth) than before the upgrade but overall it sounds great. It’s clean and punchy with fast lows, crisp mids and accurate high frequency reproduction. The biggest takeaway for me is that I had not heard my 650s sound as balanced as what I am hearing now. Besides the Valhalla, I have used the following amps for my 650s that have adequate power to properly drive them: Objective 2, Little Dot MkII, Sansui AU-317, Emotiva A-100. I have also tried it with my Avocet’s amp (it’s great with my 240DFs but not so much with the 650s).
 I used to build and paint scale models as a kid, and at one point I learned how to make my own waterslide decals. The chassis and transformer end bell each got three coats of paint, which were allowed to cure (about a week after each coat). The decals on the chassis and end bell were baked before three coats of semi gloss clear were applied (about 24 hours of drying time between coats). The baking process is long, starting at 250 degrees (Fahrenheit) for an hour, then 300 degrees for 20 minutes, then 350 and finally 400 for 20 minutes each. After three coats of clear were applied, the chassis and end bell were allowed to cure for about a week before starting the build.
While looking around for a replacement knob, I found a NOS Daka-Ware knob from the early 60’s that looks a lot like the knob on my Crane Song Avocet’s controller (my main DAC, the amp takes an unbuffered audio signal from it). I also had to trim down the pot’s shaft with my Dremel because it was too long for the knob.
The walnut base was essentially a personal challenge in woodworking. I messed up the original alder base that came with the kit because I didn’t follow the “measure twice cut once” rule with my trim router (to make the cuts you see on the base). So, I decided to build one from scratch using unfinished walnut panels I purchased from Amazon for about $20 (which required a bit of work before being able to cut). I wanted it to look like something out of the 1960s, and looked at some furniture from that period and that inspired the base’s design. This base is 1/2″ taller than the original alder case. I thought I might want to upgrade the caps to those huge ones I’ve seen people use, so the case should be a little taller to make more room for them but I’ve abandoned that idea after getting used to the sound of the amp these last few months.
The build is neat, just like I like my Bourbon.
I have finished a few woodworking projects with oil and water based polyurethanes before but have been looking for a reason to use Danish Oil. This stuff looks nicer than than most polys but it’s really meant for projects that don’t get a lot of wear and usage, so this decorative base was perfect. Unlike polyurethane, Danish Oil penetrates the wood and this gives it a more 3 dimensional look than a couple of coats of poly. The downside is the additional work and time required to end up with good looking results. Danish Oil is slow to cure and can stay a little tacky for a couple of weeks. After it fully cured, I was left with a very glossy, smooth finish. After living with it for a couple of weeks, I decided I wanted a more satin finish and so I dulled the finish with an application of furniture wax and 0000 steel wool. You can’t tell by looking at the pictures, but the base has a glass-like, smooth feel when you run your fingers through it. I’m really happy with the result.
The power cord came from a Monster Power 3500 (power conditioner/surge protector) that fried around the time I started building the kit and I noticed that it had a really heavy power cord so I decided to remove it before taking the dead 3500 to the recycling center. While researching the build, I learned that Bottlehead also has a Power Cord kit that costs about $90. They don’t make any scientific claims but say they noticed an improvement in sound quality over the stock power cords they supply with the kits and there are testimonials from customers who agree. I don’t think I would have sprung for the cord kit myself, but since this thing died, why not. The cord I pulled from the dead 3500 uses Monster Cable AC Powerline 300, which terminates to a 24k gold plated plug that has a cool-looking orange bulb right on it. I only had to purchase an angled IEC plug for it. I already had some large shrink tubing from a previous project. At one point, Monster Cable was selling an 8-foot power cord for more than $100 that uses this AC line. It has 10 awg wires, Mylar film between the heavy-shielded leads and the outer rubber sleeve and the description for this line that I found online states it helps with EMI/RFI rejection.
 I was definitely curious to see if I could hear a difference over the included power cord, but I can’t say I hear a noticeable improvement over the included power cord when listening to music. With nothing playing, the amp still has a very small amount of noise at full volume, and with this power cord the noise at full volume is slightly reduced, though still not completely silent. I noticed this more after adding the Speedball circuit. Maybe that helps too but if I’m being completely honest, I can’t say that I noticed a remarkable improvement. It does definitely remove that little bit of noise at full volume that I hear with the included cord and I guess that makes this power cord an improvement. The Speedball upgrade definitely works as advertised. At normal listening levels (and a bit beyond) the amp is dead quiet.
Overall, I’m very happy with the amp. After living with it complete with the Speedball upgrade for a few months now, I can confidently say that I have found my 650’s perfect pairing. Looking at the finished Crack with Speedball one might think that it has tons of color because frankly, it screams “tube amp!” I think that if it colors the audio, it does so in a way that balances the Sennheiser 650s in a way I haven’t heard from any of the amps I’ve tried with them, while giving them a huge soundstage. I like using them as a reference when Mastering audio to hear what the low end sounds like on them, but now I’m getting a bigger “picture” out of them and I can hear details in the mids and highs that I wasn’t before.

Thank you for sharing your thoughts.
wow!! 42Building the Bottlehead Crack Headphone Amplifier (Review & Impressions)